Password Protect a WordPress Page
Hello friend how to Password protect WordPress without plugin, Password protect WordPress plugin, Password Protect a WordPress Page, WordPress password protect page not working, Password protect a wordpress page free, WordPress password protected page template, WordPress password protected page with username, WordPress password protected page multiple passwords, WordPress password protect custom post type.
First, let’s look at how to password protect a page in WordPress without a plugin, and why it’s a bad idea.
- Creating a password protected WordPress page is actually pretty simple:
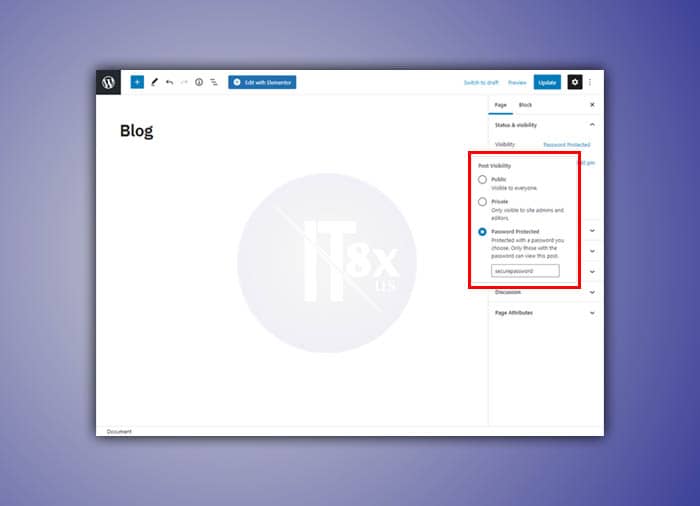
- Start by navigating to the page’s edit page screen.
- Click on the Visibility button then select Password Protected.
- Now enter a password and click on the Update button to continue.
- Password protected WordPress page
Password protect a WordPress page natively
The settings to add password protection to a page are available through the admin dashboard. Therefore, our first step would be to log in to the WordPress admin dashboard.
WordPress comes with the capability to password-protect the contents of a page or post built into it. Each post or page where you have password-protected content can have its own unique password. Visitors will only be able to see the contents of a protected page once they enter the correct password.
WPEngine Page Speed Boost , Improve PageSpeed
After that, navigate to either Posts > All Posts to see a list of posts or Pages > All Pages to see a list of pages.
There are several problems with this approach:
It’s time-consuming to set up because you have to password protect each WordPress page individually. There’s no way to password protect multiple WordPress pages at once or an entire WordPress site, using a single password.
In addition to this, it is also not user-friendly for site visitors due to limitations in the way WordPress uses cookies. Your website visitors will have to enter the correct password for each page they access on your website, even if you’ve used the same password to protect multiple pages
Site visitors who don’t have the password can still see certain parts of content from the restricted page. It doesn’t fully hide the page from people who don’t have access. This looks unprofessional.
Unauthorized users will still be able to see restricted content in public areas of your WordPress site including sitemaps, search engines, widgets, and newsletters. As a result, this can cause poor SEO and lead to confusion. They will be able to partially see your page in SERPs but not actually visit them.
There’s no way to customize the wording of the login form for password protect pages.
As you can see, password protecting individual WordPress pages isn’t ideal. Luckily, there’s a better way.
A better solution – Use the best WordPress password protected page plugin
The best way to create a WordPress password protected site or page is by using a plugin specifically designed to let you restrict content by using secure passwords.
Password Protected Categories is the perfect WordPress password protected page plugin. It offers an intuitive way of password protecting certain parts of your site while improving user experience.
Click on the Public button, and it will open a popup where you can select Password Protected. You should now see a new input field where you can enter a strong password that users need to enter to view this post.
Save the changes for the visibility settings to take effect. You can do so by clicking the Update or Publish button available at the top. The Update button shows up in the block editor for existing WordPress posts. The Publish button is for new WordPress posts.
Anyone visiting this webpage now will be asked to enter the password before seeing its contents.
It’s quick and easy to set up because the password protection works at category level rather than per page.
Users enter a single password to unlock entire groups of pages – no need to enter passwords multiple times.
The Password Protected Categories plugin automatically hides protected pages from search engines and from real users who haven’t entered the password.
You get a fully customizable login form.
If some of your users already have an account on your WordPress site, then they can bypass the password protection. For each password protected category, simply select the user roles or even specific users who should have automatic access.
The Password Protected Categories plugin works for any post type including WordPress pages, WooCommerce pages, and blog posts. It also offers an easy way to password protect any other custom post type on your WordPress site. It’s mnot just for password protecting pages
This method is also great if you’re building a membership site: you can password protect only your premium post categories, leaving you with the rest of your site public. This is a better option than using a membership plugin as it’s so much simpler to set up.
Hide password protected pages and categories
The Password Protected Categories plugin offers a great way to hide password protected categories and all the pages within them from the public parts of your site. This way, people won’t even know the selected password protected WordPress pages exist unless you want them to.
Alternatively, you can leave the password protected pages visible on your public site. When people click on them, they will be promoted to enter the password. Unlike with pages that use the basic WordPress password protection, you can customize the login form. That way, you can add a clear message explaining that the page is password protected and what to do next. That way, you get the best of both worlds for people with and without the password.
No need to password protect pages individually
The password protected pages plugin offers an intuitive setup. All you need to do is set a password for any category of pages and the plugin will cleverly protect all the pages within that specific category.
This way, you save a lot of time password protecting multiple pages on your website.
Better for your users
The Password Protected Categories plugin also offers an easy login experience for people who have the password. You redirect users to an attractive login page where they can enter the password and instantly be redirected to the category of pages that matches the password.
Then, users can access all the pages in that specific category and subcategory, without having to re-enter any passwords. They can freely navigate the restricted content and jump through multiple pages without being distracted by a login form page over and over again.
Supports multiple passwords
You can also create multiple passwords and assign them to specific categories using the WordPress Password Protected Categories plugin.
Alternatively, create multiple passwords for the same group of pages. Give each password to a different user. This means that you can easily revoke (i.e. delete) a password for people who no longer need access.
User and role protection
Additionally, the plugin lets you restrict page categories to specific logged-in users only based on their user role or username. This is a great way to offer exclusive content or create a “members-only” area on your website.
The best way to use this is to give normal passwords for people who don’t have their own user account. If you’re giving access to anyone who does have an account, don’t waste their time by giving them a separate password. Instead, just edit the category and give access to that user. They will automatically get access whenever they’re logged in, while everyone else must enter the password.
For your own ease of use, we also recommend giving the Administrator user role access to your password protected categories. That way, you can view them without needing to enter the category password.
How to password protect WordPress pages and other content
Next, I’ll show you how to password protect WordPress pages easily in three simple steps. For this, you’ll need a WordPress site along with the Password Protected Categories plugin.
Additionally, if you want to protect pages then you’ll also need a plugin that allows your WordPress pages to be categorized. We’ll be using the free Easy Post Types and Fields WordPress plugin to create page categories.
Install Password Protected Categories
Once you’ve created and added page categories to your WordPress website, install the Password Protected Categories plugin on your website.
Activate the plugin and follow the instructions in the setup wizard. Untick the Show Categories? checkbox to make sure unauthorized users don’t access the hidden page categories.
Password protect WordPress pages
It’s very simple to password protect WordPress pages using the Password Protected Categories plugin.
First, you need to add categories to your pages because this isn’t part of WordPress as it comes. (Skip this if you’re password protecting other types of WordPress content which already have categories or custom taxonomies.) To do this:
- Install the free Easy Post Types and Fields plugin via Plugins → Add New.
- Skip the setup wizard and go to Post Types → Manage → Other Post Types.
- Click to add a new custom taxonomy to the ‘Page’ post type. Tick the ‘Hierarchical’ box and call the taxonomy whatever you like, such as ‘Page Categories’.
WordPress page categories plugin
Once you’ve done that, navigate to Pages → Categories (or whatever you called your page categories) and select the category you want to restrict access to.
add password to woocommerce protected categories
Hide the category by selecting the Password protected check field under the Visibility option. You can enter your password in the text field below the selected option and add multiple passwords using the (+) button. Optionally select any users or roles who should have access without needing to enter the password.
Once you’re done, press the Update button to save changes.
Create a login form
Now, we want to create a central login page for all your password protected WordPress content.
Navigate to Pages → Add New to create a new login page and customize it however you want. Paste the [category_login] shortcode in the login page you just created and click on the Publish button to continue.
You can customize your login page using the Password Protected Categories plugin. Head on over to Settings → Protected Categories from the WordPress admin panel. Here, you can customize the button text, the title, the login form message, and the password label. Once you’re done click on the Save changes button to continue.
Users will be able to access your content by entering any of the passwords assigned to the specific page category. Here’s how the password form looks on the front-end of your WordPress site:
Password form preview front-end
Once the user enters their passwords, they will be able to access all pages or all restricted content which use that password.
The manual method (use of the WordPress content editor) will already give you a valuable hand in password-protecting a page quickly.
However, this method has some limitations. Without touching the code, you cannot, among other things:
Change the visual appearance (design) of the field indicating to your visitor that he has to fill in a password. By default, it inherits the colors of your theme.
Customize the texts displayed on your protected page (excerpt, button, etc.)
Set the lifetime of a cookie: Before it expires, the visitor will no longer need to enter his password to view the page, as long as he has entered it once.
These limits are overcome by using a dedicated plugin. On the official directory, there are two main ones for protecting a page on WordPress with a password:
- PPWP – Password Protect Pages and Content. This is the most popular one, with 30K+ active installations.
- Passster – Password Protection, which has 10K+ active installations.
- Both plugins are frequently updated and have a similar overall rating.
As a user, I found Passster’s interface simpler and more pleasant to use, which is why I will focus on this one in the next few lines.
But frankly, it’s very comparable to PPWP, which you can also use without any problem.
Let’s start setting up Passster right away.
Step 1: Install and activate Passter
Go to Plugins > Add New, then type Passster (with three “s”) in the search bar.
Password Protect a WordPress Page FAQ
How to set a password in WordPress?
- Visit your profile at https://wordpress.com/me.
- Click on “Security” on the left side.
- Click on the “Password” option.
- Type your new password in the box or click the “Generate strong password” button to create a random strong password.
How do I password protect a page on WordPress?
- Go to Posts, then All Posts.
- Click Edit on a specific page or post.
- Using the Publish menu, change the visibility to Password Protected.
- Enter a password.